Introduction
Welcome to the Birch documentation.
Birch is a free, simple, secure remote logger for mobile applications that connects your apps to existing logging infrastructure that your company may already have in place.
Birch provides device management to remotely adjust log levels and upload frequency of any individual installation of your project. It also provides configuration to manage verbosity for different environments such as production, staging, etc.
If a client is having issues that you can't reproduce locally, you can simply increase the log verbosity of their device without requiring them to send you log files or install a different build.
Learn more at https://birch.ryanfung.com
Installation for Android
Add jitpack to your project build.gradle
allprojects {
    repositories {
        ...
        maven { url 'https://www.jitpack.io' }
    }
}
Add Birch to your app build.gradle
implementation 'com.ryanfung.birch-android:birch:1.8.0'
If you use Timber, you can also use the following:
implementation 'com.ryanfung.birch-android:birch-timber:1.8.0'
Initializing the logger
In your application class, initialize the logger.
class MyApp: Application() {

  override fun onCreate() {
    super.onCreate()

    // This is a sample of how you might want to configure the logger between development and production builds.
    if (BuildConfig.DEBUG) {
      Birch.level = Level.TRACE // This overrides the server configuration during local development. The default is null.
      Birch.synchronous = true // This makes the logger log synchronously. The default is false.
    } else {
      Birch.console = false // Disable console logging in production.
    }

    Birch.debug = true // This line should be removed after you've successfully integrated. It is only used to help you debug the integration if you're having issues.
    Birch.init(this, "YOUR_API_KEY", "YOUR_PUBLIC_ENCRYPTION_KEY")
    Birch.identifier = "your_user_id" // this is optional but highly recommended
  }
}
Logging
Use the logger as you would with logcat.
Birch.t("trace message") // simplest
Birch.t { "trace message" } // most performant especially if it's expensive to build the log message.

Birch.d("debug message")
Birch.d { "debug message" }

Birch.i("info message")
Birch.i { "info message" }

Birch.w("warn message")
Birch.w { "warn message" }

Birch.e("error message")
Birch.e { "error message" }
Bindings
Installation for iOS, macOS and tvOS.
Birch supports iOS 11+, macOS 10.13+, tvOS 11+ and Swift 5+.
Cocoapods
pod 'Birch'
Carthage
github "gruffins/birch-swift"
Swift Package Manager
.package(url: "https://github.com/gruffins/birch-swift.git", majorVersion: 1)
Inializing the logger
In your app delegate class, initialize the logger.
import Birch

@UIApplicationMain
class AppDelegate: UIResponder, UIApplicationDelegate {

  func application(_ application: UIApplication, didFinishLaunchingWithOptions launchOptions: [UIApplicationLaunchOptionsKey: Any]?) -> Bool {
    #if DEBUG
      Birch.level = .trace // This overrides the server configuration during local development. The default is null.
      Birch.synchronous = true // This makes the logger log synchronously. The default is false.
    #else
      Birch.console = false // Disable console logging in production.
    #endif

    Birch.debug = true // This line should be removed after you've successfully integrated.
    Birch.initialize("YOUR_API_KEY", publicKey: "YOUR_PUBLIC_ENCRYPTION_KEY")

    return true
    }
}
If the DEBUG flag doesnt work, you may need to add -DDEBUG to OTHER_SWIFT_FLAGS.
Logging
Use the logger as you would with any logger.
Birch.t("trace message") // simplest
Birch.t { "trace message" } // most performant especially if it's expensive to build the log message.

Birch.d("debug message")
Birch.d { "debug message" }

Birch.i("info message")
Birch.i { "info message" }

Birch.w("warn message")
Birch.w { "warn message" }

Birch.e("error message")
Birch.e { "error message" }
Bindings
Installation for React Native
npm i react-native-birch
Initalize the logger
import Birch from 'react-native-birch';
import { useEffect } from 'react';

export default function App() {
  useEffect(() => {
    Birch.init({
      apiKey: "your_api_key",
      publicKey: "public_encryption_key",
    });
  }, []);
}
Logging
Use the logger as you would with any logger.
Birch.t("trace message");
Birch.d("debug message");
Birch.i("info message");
Birch.w("warn message");
Birch.e("error message");
 Birch.kt
console(): Boolean
Returns whether console logging is enabled.
val console = Birch.console
console(console: Boolean)
Set whether console logging is enabled. This can be useful in DEBUG builds, otherwise it's better to be false.
Birch.console = true
customProperties(): Map<String, String>
Returns the custom properties set on the logger.
val properties = Birch.customProperties
customProperties(properties: Map<String, String>)
Sets the custom properties on the logger. Properties are persisted and sent with each log message. Limit key name length and number of properties, certain drains have limits imposed by the provider.
Birch.customProperties = mapOf("country" to "usa")
debug(): Boolean
Returns whether the logger is in debug mode. Debug logs Birch operations.
val debug = Birch.debug
debug(debug: Boolean)
Sets the logger to debug mode on/off.
Birch.debug = true
syncConfiguration()
Force the agent to synchronize with the server.
Birch.syncConfiguration()
flush()
Force the agent to upload logs. This will rotate the current log file then queue a job to push logs back to the server.
Birch.flush
identifier(): String?
Returns the identifier set on the logger. The identifier is sent with each log message.
val identifier = Birch.identifier
identifier(identifier: String?)
Sets the identifier for Birch. This is typically set to the user_id but you can set it to anything that you use as an identifier in your system.
Birch.identifier = "your_user_id"
init(context: Context, apiKey: String, publicKey: String?, options: Options)
Initializes the logger to start processing and uploading logs. Calling it twice will do nothing.
| Param | Description |
|---|---|
| context | Any context will suffice, Birch will get the application context from it. |
| apiKey | The api key for your environment. |
| publicKey | The base64 encoded public encryption key, leaving this null will lead to unencrypted logs on disk. |
| options | Additional options to apply to the agent. |
val apiKey = "your_api_key"
val publicKey = "public_encryption_key"
val options = Options().also {
  it.scrubbers = listOf(PasswordScrubber(), EmailScrubber())
}

Birch.init(this, apiKey, publicKey, options)
level(): Level?
Returns the log level override.
val level = Birch.level
level(level: Level?)
Overrides the logger log level. This value overrides the server so you may only want to use this in DEBUG builds.
Birch.level = Level.TRACE
optOut: Boolean
Returns whether the logger has been opted out of.
val optOut = Birch.optOut
optOut(optOut: Boolean)
Set whether to opt out of logging. This will disable logging and device synchronization.
Birch.optOut = true
remote(): Boolean
Gets whether remote logging is enabled.
val remote = Birch.remote
remote(remote: Boolean)
Set whether remote logging is enabled. This can be useful to limit remote logging in DEBUG builds, otherwise it should be left as true.
Birch.remote = true
synchronous(): Boolean
Return whether the logger is logging synchronously.
val sync = Birch.synchronous
synchronous(synchronous: Boolean)
Set whether the logger should operate synchronously. This can be useful in DEBUG builds, otherwise it should be left as false.
Birch.synchronous = true
uuid(): String
Returns the assigned UUID for this source.
val uuid = Birch.uuid
 Birch.swift
console(): Bool
Returns whether console logging is enabled.
let console = Birch.console
console(_ console: Bool)
Set whether console logging is enabled. This can be useful in DEBUG builds, otherwise it's better to be false.
Birch.console = true
customProperties(): [String: String]
Returns the custom properties set on the logger.
let properties = Birch.customProperties
customProperties(_ properties: [String: String])
Sets the custom properties on the logger. Properties are persisted and sent with each log message. Limit key name length and number of properties, certain drains have limits imposed by the provider.
Birch.customProperties = ["country": "usa"]
debug(): Bool
Returns whether the logger is in debug mode. Debug logs Birch operations.
let debug = Birch.debug
debug(_ debug: Bool)
Sets the logger to debug mode on/off.
Birch.debug = true
syncConfiguration()
Force the agent to synchronize with the server.
Birch.syncConfiguration()
flush()
Force the agent to upload logs. This will rotate the current log file then queue a job to push logs back to the server.
Birch.flush()
identifier(): String?
Returns the identifier set on the logger. The identifier is sent with each log message.
let identifier = Birch.identifier
identifier(_ identifier: String?)
Sets the identifier for Birch. This is typically set to the user_id but you can set it to anything that you use as an identifier in your system.
Birch.identifier = "your_user_id"
initialize(_ apiKey: String, publicKey: String?, options: Options)
Initializes the logger to start processing and uploading logs. Calling it twice will do nothing.
| Param | Description |
|---|---|
| apiKey | The api key for your environment. |
| publicKey | The base64 encoded public encryption key, leaving this null will lead to unencrypted logs on disk. |
| options | Additional options to apply to the agent. |
let apiKey = "your_api_key"
let publicKey = "public_encryption_key"
let options = Options()
options.scrubbers = [PasswordScrubber(), EmailScrubber()]

Birch.initialize(apiKey, publicKey: publicKey, options: options)
level(): Level?
Returns the log level override.
let level = Birch.level
level(_ level: Level?)
Overrides the logger log level. This value overrides the server so you may only want to use this in DEBUG builds.
Birch.level = .trace
optOut(): Bool
Returns whether the logger has been opted out of.
let optOut = Birch.optOut
optOut(_ optOut: Bool)
Set whether to opt out of logging. This will disable logging and device synchronization.
Birch.optOut = true
remote(): Bool
Gets whether remote logging is enabled.
let remote = Birch.remote
remote(_ remote: Bool)
Set whether remote logging is enabled. This can be useful to limit remote logging in DEBUG builds, otherwise it should be left as true.
Brich.remote = true
synchronous(): Bool
Return whether the logger is logging synchronously.
let sync = Birch.synchronous
synchronous(_ synchronous: Bool)
Set whether the logger should operate synchronously. This can be useful in DEBUG builds, otherwise it should be left as false.
Birch.synchronous = true
uuid(): String
Returns the assigned UUID for this source.
let uuid = Birch.uuid
 Birch.ts
getConsole(): Promise<boolean>
Returns whether console logging is enabled.
let allowConsole = await Birch.getConsole();
setConsole(value: boolean)
Set whether console logging is enabled. This can be useful in DEBUG builds, otherwise it's better to be false.
Birch.setConsole(true);
getCustomProperties(): Promise<Record<string, string>>
Returns the custom properties set on the logger.
const customProperties = await Birch.getCustomProperties();
setCustomProperties(value: Record<string, string>)
Sets the custom properties on the logger. Properties are persisted and sent with each log message. Limit key name length and number of properties, certain drains have limits imposed by the provider.
Birch.setCustomProperties({});
getDebug(): Promise<boolean>
Returns whether the logger is in debug mode. Debug logs Birch operations.
const debug = await Birch.getDebug();
setDebug(value: boolean)
Sets the logger to debug mode on/off.
Birch.setDebug(true);
syncConfiguration()
Force the agent to synchronize with the server.
Birch.syncConfiguration();
flush()
Force the agent to upload logs. This will rotate the current log file then queue a job to push logs back to the server.
Birch.flush();
getIdentifier(): Promise<string | undefined>
Returns the identifier set on the logger. The identifier is sent with each log message.
const identifier = await Birch.getIdentifier();
setIdentifier(value: string | undefined)
Sets the identifier for Birch. This is typically set to the user_id but you can set it to anything that you use as an identifier in your system.
Birch.setIdentifier("your_user_id");
init(apiKey: string, publicKey: string | undefined, options: Options)
Initializes the logger to start processing and uploading logs. Calling it twice will do nothing.
| Param | Description |
|---|---|
| apiKey | The api key for your environment. |
| publicKey | The base64 encoded public encryption key, leaving this undefined will lead to unencrypted logs on disk. |
| options | Additional options to apply to the agent. |
import Birch, { Level } from 'react-native-birch';

const apiKey = "your_api_key";
const publicKey = "public_encryption_key"
const options = {
  defaultLevel: Level.Trace
}

Birch.init(apiKey, publicKey, options);
getLevel(): Promise<Level | undefined>
Returns the log level override.
const level = await Birch.getLevel();
setLevel(value: Level | undefined)
Overrides the logger log level. This value overrides the server so you may only want to use this in DEBUG builds.
Birch.setLevel(Level.trace);
getOptOut(): Promise<boolean>
Returns whether the logger has been opted out of.
const optOut = await Birch.getOptOut();
setOptOut(value: boolean)
Set whether to opt out of logging. This will disable logging and device synchronization.
Birch.setOptOut(true);
getRemote(): Promise<boolean>
Gets whether remote logging is enabled.
const remote = await Birch.getRemote();
setRemote(value: boolean)
Set whether remote logging is enabled. This can be useful to limit remote logging in DEBUG builds, otherwise it should be left as true.
Brich.setRemote(true);
getSynchronous(): Promise<boolean>
Return whether the logger is logging synchronously.
const sync = await Birch.getSynchronous();
setSynchronous(value: boolean)
Set whether the logger should operate synchronously. This can be useful in DEBUG builds, otherwise it should be left as false.
Birch.setSynchronous(true);
getUuid(): Promise<string>
Returns the assigned UUID for this source.
const uuid = await Birch.getUuid();

CloudWatch
Integration
AWS Access
Either create programmatic access user or provide an existing one.
This user must have the following permissions:
- logs:CreateLogGroup
- logs:CreateLogStream
- logs:PutLogEvents
The AWSAppSyncPushToCloudWatchLogs premade role has these permissions.
Birch
Add the integration to your dashboard.
| Field | Value | Required |
|---|---|---|
| Name | A name to identify the drain | ✔ |
| Access Key ID | The access key id of the AWS user used to authenticate | ✔ |
| Secret Access Key | The secret access key of the user used to authenticate | ✔ |
| Region | Must match the region of your AWS account | ✔ |
| Log Group Name | The log group to place the logs in, many call it birch | ✔ |
Log Format
CloudWatch only supports the following:
- timestamp
- message
Log Stream
The log_stream ends up being the identifier of the source.
Example:
Birch.identifier is nil so logs end up in
log_group/source_uuid
Another example:
Birch.identifier = user.id so logs end up in
log_group/user.id
If the identifier changes on the source, the logs made under the old identifier continue to flow to the old log stream and new logs will flow to the new log stream.

Datadog
Integration
API Key
Either generate a new API key or provide an existing one.
Birch
Add the integration to your dashboard.
| Field | Value | Required |
|---|---|---|
| Name | A name to identify the drain | ✔ |
| API Key | The Datadog API key used to authenticate | ✔ |
Log Format
Logs are sent with the given format:
{
  "ddsource": "birch",
  "ddtags": "platform=android,custom_property__key_1:value1,custom_property__key_2:value2",
  "hostname": "birch.ryanfung.com",
  "message": "2023-01-18T13:24:59Z DEBUG Your message",
  "service": "client"
}

Elasticsearch
Integration
API Key
Either create a new API key or provide an existing one.
Birch
Add the integration to your dashboard.
| Field | Value | Required |
|---|---|---|
| Name | A name to identifiy the drain | ✔ |
| API Key | The API key used to authenticate | ✔ |
| Elastic Index | Which index to place the logs under | ✔ |
| URL | The full url to your elasticsearch instance | ✔ |
Log Format
{
    "timestamp": "2022-10-25T02:05:15+00:00",
    "level": 0,
    "source": {
      "uuid": "954257b7-1feb-4fd1-8cb8-a047a105ff26",
      "package_name": "com.gruffins.birch.app",
      "app_version": "1.0",
      "app_build_number": "1",
      "brand": "google",
      "manufacturer": "google",
      "model": "pixel 3a",
      "os": "Android",
      "identifier": "user_id",
      "custom_property__key": "value",
      "custom_property__key_1": "value 1"
    },
    "message": "hello"
  }
Google Cloud Logging
Integration
Google Services Account
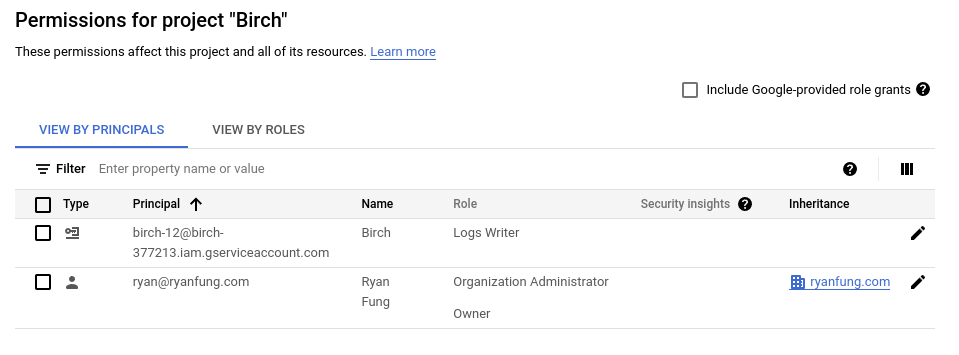
Create a new Service Account that will allow Birch to write logs to your Google project.
The account will need the Logs Writer role in order to write logs to your project.
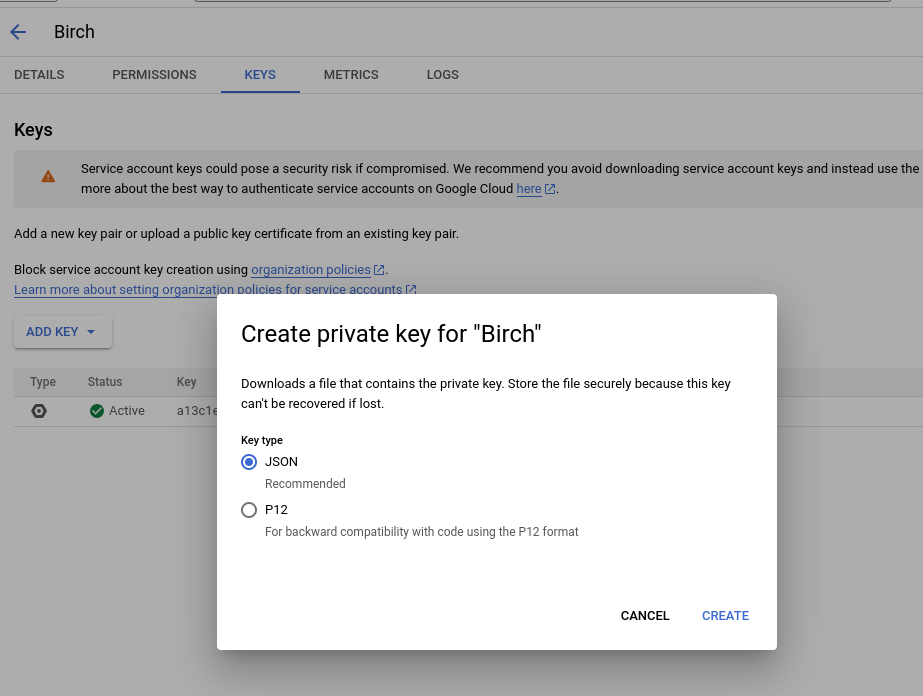
You will also need to generate a JSON private key that will be used to authenticate Birch with your project.
Birch
Add the integration to your dashboard.
| Field | Value | Required |
|---|---|---|
| Name | A name to identifiy the drain | ✔ |
| Project ID | Your Google project ID | ✔ |
| Service account credentials | The JSON private key used to authenticate | ✔ |
Log Format Mapping
| Birch | Google Cloud Logging |
|---|---|
| message | payload |
| timestamp | timestamp |
| source (and custom properties) | labels |
| identifier | log_name |
| level | severity |

Loggly
Integration
Token
Either create a new token or use an existing one to allow Birch to write logs to your account.
Birch
Add the integration to your dashboard.
| Field | Value | Required |
|---|---|---|
| Name | A name to identify the drain | ✔ |
| Customer Token | The token used to authenticate | ✔ |
Log Format
Logs are automaticaly written under the birch tag.
{
  "timestamp": "2022-10-25T02:05:15+00:00",
  "level": 0,
  "source": {
    "uuid": "954257b7-1feb-4fd1-8cb8-a047a105ff26",
    "package_name": "com.gruffins.birch.app",
    "app_version": "1.0",
    "app_build_number": "1",
    "brand": "google",
    "manufacturer": "google",
    "model": "pixel 3a",
    "os": "Android",
    "identifier": "user_id",
    "custom_property__key": "value",
    "custom_property__key_1": "value 1"
  },
  "message": "hello"
}

Logtail
Integration
Create a New Source
Create a new HTTP source to accept logs from Birch.
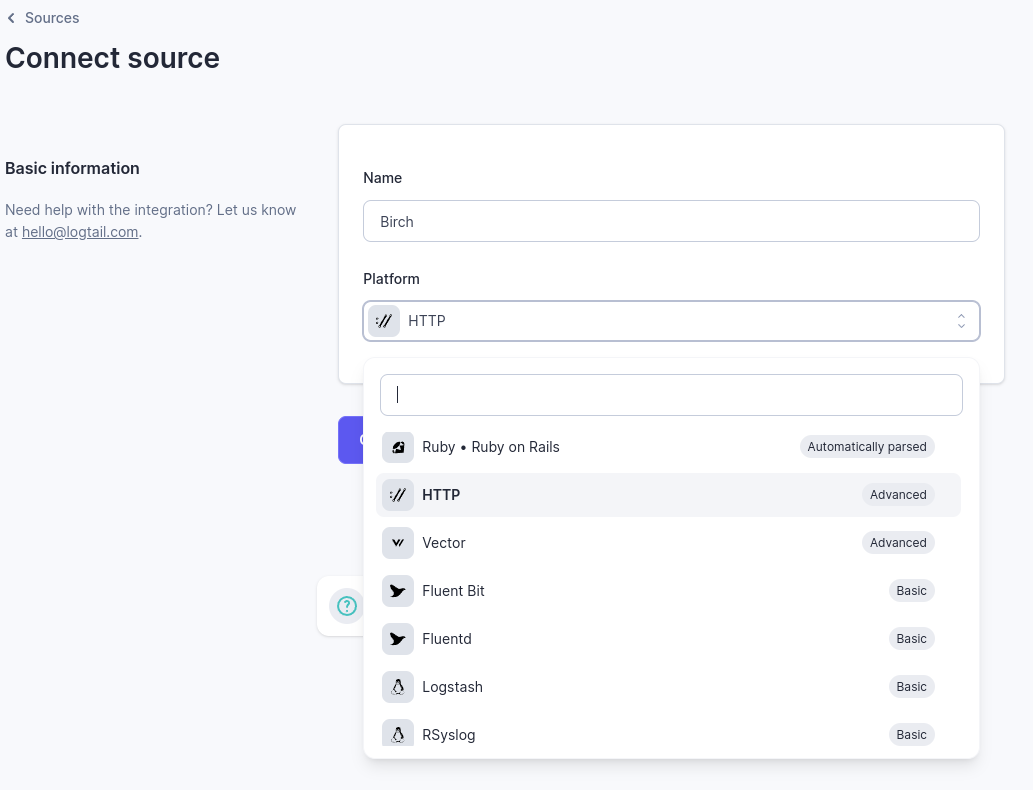
Copy the Source Token
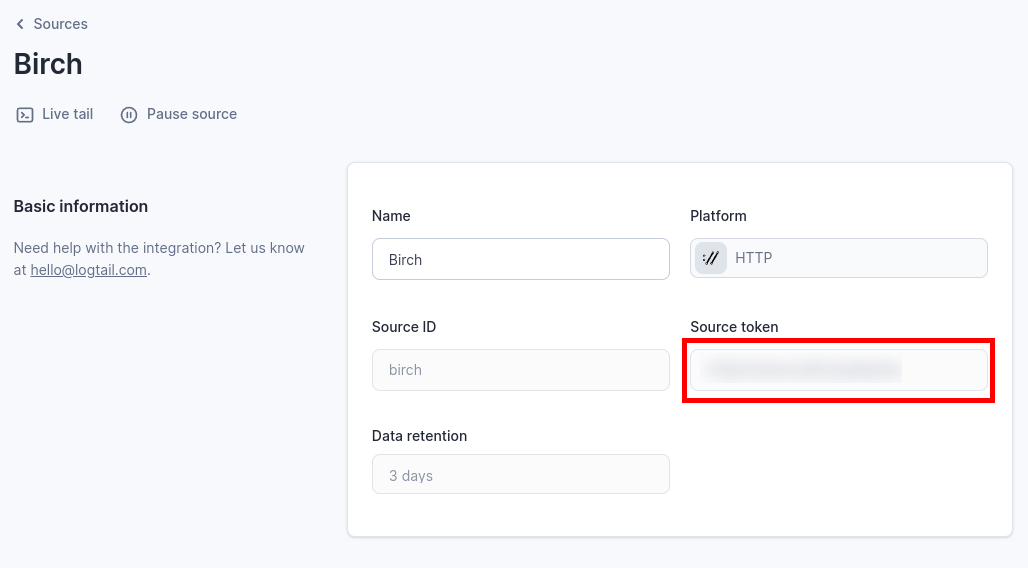
Birch
Add the integration to your dashboard.
| Field | Value | Required |
|---|---|---|
| Name | A name to identify the drain | ✔ |
| Source Token | The source token used to authenticate | ✔ |
Log Format
{
  "timestamp": "2022-10-25T02:05:15+00:00",
  "level": 0,
  "source": {
    "uuid": "954257b7-1feb-4fd1-8cb8-a047a105ff26",
    "package_name": "com.gruffins.birch.app",
    "app_version": "1.0",
    "app_build_number": "1",
    "brand": "google",
    "manufacturer": "google",
    "model": "pixel 3a",
    "os": "Android",
    "identifier": "user_id",
    "custom_property__key": "value",
    "custom_property__key_1": "value 1"
  },
  "message": "hello"
}

Logz
Integration
Shipping Token
Either create a new shipping token or provide an existing one.
Birch
Add the integration to your dashboard.
| Field | Value | Required |
|---|---|---|
| Name | A name to identify the drain | ✔ |
| Shipping Token | The shipping token used to authenticate | ✔ |
| Region | The region of your Logz account | ✔ |
Log Format
{
  "timestamp": "2022-10-25T02:05:15+00:00",
  "level": 0,
  "source": {
    "uuid": "954257b7-1feb-4fd1-8cb8-a047a105ff26",
    "package_name": "com.gruffins.birch.app",
    "app_version": "1.0",
    "app_build_number": "1",
    "brand": "google",
    "manufacturer": "google",
    "model": "pixel 3a",
    "os": "Android",
    "identifier": "user_id",
    "custom_property__key": "value",
    "custom_property__key_1": "value 1"
  },
  "message": "hello"
}

New Relic
Integration
License Key
Either create a new License Key or provide an existing one.

Birch
Add the integration to your dashboard.
| Field | Value | Required |
|---|---|---|
| Name | A name ot identify the drain | ✔ |
| License Key | The license key used to authenticate | ✔ |
| Region | The region of your New Relic account | ✔ |
Log Format
{
  "timestamp": "1674146985",
  "source": {
    "uuid": "954257b7-1feb-4fd1-8cb8-a047a105ff26",
    "package_name": "com.gruffins.birch.app",
    "app_version": "1.0",
    "app_build_number": "1",
    "brand": "google",
    "manufacturer": "google",
    "model": "pixel 3a",
    "os": "Android",
    "identifier": "user_id",
    "custom_property__key": "value",
    "custom_property__key_1": "value 1"
  },
  "message": "hello"
}

Papertrail
Integration
Create a Log Destination
Create a new Token based destination to accept logs from Birch.
Birch
Add the integration to your dashboard.
| Field | Value | Required |
|---|---|---|
| Name | A name to identify the drain | ✔ |
| API Key | The token used to authenticate | ✔ |
Log Format
Papertrail does not support displaying a timestamp other than when the log was received. This means if a device was offline and the logs were created 8 hours ago but uploaded now. The timestamp displayed would be now and not when the log was created.
The logs are still created in the correct order so relative timing will be correct.
{
  "timestamp": "2022-10-25T02:05:15+00:00",
  "level": 0,
  "source": {
    "uuid": "954257b7-1feb-4fd1-8cb8-a047a105ff26",
    "package_name": "com.gruffins.birch.app",
    "app_version": "1.0",
    "app_build_number": "1",
    "brand": "google",
    "manufacturer": "google",
    "model": "pixel 3a",
    "os": "Android",
    "identifier": "user_id",
    "custom_property__key": "value",
    "custom_property__key_1": "value 1"
  },
  "message": "hello"
}

S3
Integration
AWS Access
Either create a programmatic access user or provide an existing one.
This user must have the following permissions:
- s3:PutObject on the bucket.
Birch
Add the integration to your dashboard.
| Field | Value | Required |
|---|---|---|
| Name | A name to identify the drain | ✔ |
| Access Key ID | The access key id of the AWS user used to authenticate | ✔ |
| Secret Access Key | The secret access key of the AWS user used to authenticate | ✔ |
| Region | Must match the region of your AWS account | ✔ |
| Bucket | The bucket to place the logs in | ✔ |
| Key Prefix | A prefix to the path where the logs are put. See additional documentation |
Key Prefix
Logs will be saved to **s3://:bucket/(:key_prefix/):source_identifier/:timestamp.json
Let's say you have the following setup:
- Bucket is your_company
- Key prefix is null
- You did not set an identifier on the logger.
Birch.identifier = nil - The UUID is
e903d25d-eabc-4038-a149-bccf87830021. Example:let uuid = Birch.uuid
Logs will be written to:
s3://your_company/e903d25d-eabc-4038-a149-bccf87830021/1674146985.json
Let's say you have this setup:
- Bucket is your_company
- Key prefix is birch_logs
- You set an identifier on the logger.
Birch.identifier = "abc123"
Logs will be written to
s3://your_company/birch_logs/abc123/1674146985.json
Log Format
[
  {
    "timestamp": "2022-10-25T02:05:15+00:00",
    "level": 0,
    "source": {
      "uuid": "954257b7-1feb-4fd1-8cb8-a047a105ff26",
      "package_name": "com.gruffins.birch.app",
      "app_version": "1.0",
      "app_build_number": "1",
      "brand": "google",
      "manufacturer": "google",
      "model": "pixel 3a",
      "os": "Android",
      "identifier": "user_id",
      "custom_property__key": "value",
      "custom_property__key_1": "value 1"
    },
    "message": "hello"
  }
]

Wasabi
Integration
Wasabi Access
Either create a programmatic access user or provide an existing one.
This user must have the following permissions:
- s3:PutObject on the bucket.
Birch
Add the integration to your dashboard.
| Field | Value | Required |
|---|---|---|
| Name | A name to identify the drain | ✔ |
| Access Key ID | The access key id of the Wasabi user used to authenticate | ✔ |
| Secret Access Key | The secret access key of the Wasabi user used to authenticate | ✔ |
| Region | Must match the region of your Wasabi account | ✔ |
| Bucket | The bucket to place the logs in | ✔ |
| Key Prefix | A prefix to the path where the logs are put. See additional documentation |
Key Prefix
Logs will be saved to **s3://:bucket/(:key_prefix/):source_identifier/:timestamp.json
Let's say you have the following setup:
- Bucket is your_company
- Key prefix is null
- You did not set an identifier on the logger.
Birch.identifier = nil - The UUID is
e903d25d-eabc-4038-a149-bccf87830021. Example:let uuid = Birch.uuid
Logs will be written to:
s3://your_company/e903d25d-eabc-4038-a149-bccf87830021/1674146985.json
Let's say you have this setup:
- Bucket is your_company
- Key prefix is birch_logs
- You set an identifier on the logger.
Birch.identifier = "abc123"
Logs will be written to
s3://your_company/birch_logs/abc123/1674146985.json
Log Format
[
  {
    "timestamp": "2022-10-25T02:05:15+00:00",
    "level": 0,
    "source": {
      "uuid": "954257b7-1feb-4fd1-8cb8-a047a105ff26",
      "package_name": "com.gruffins.birch.app",
      "app_version": "1.0",
      "app_build_number": "1",
      "brand": "google",
      "manufacturer": "google",
      "model": "pixel 3a",
      "os": "Android",
      "identifier": "user_id",
      "custom_property__key": "value",
      "custom_property__key_1": "value 1"
    },
    "message": "hello"
  }
]

Webhook
Integration
Your webhook must be publicly available and be secure. Birch will not deliver logs to an endpoint without SSL/TLS.
The endpoint should return 200-299 status code to signal that the logs were received, any other response will queue the logs for retry.
Birch
Add the integration to your dashboard.
| Field | Value | Required |
|---|---|---|
| Name | A name to identify the drain | ✔ |
| Url | The url to your endpoint | ✔ |
Securing your endpoint
There are 2 options for securing your endpoint:
- Basic Authentication
- Query Parameters
Basic Authentication
You can format your url as follows:
https://username:password@your_domain.com/endpoint
Query Params
You can format your url as follows:
https://your_domain.com/endpoint?access_token=your_access_token
Log Format
[
  {
    "timestamp": "2022-10-25T02:05:15+00:00",
    "level": 0,
    "source": {
      "uuid": "954257b7-1feb-4fd1-8cb8-a047a105ff26",
      "package_name": "com.gruffins.birch.app",
      "app_version": "1.0",
      "app_build_number": "1",
      "brand": "google",
      "manufacturer": "google",
      "model": "pixel 3a",
      "os": "Android",
      "identifier": "user_id",
      "custom_property__key": "value",
      "custom_property__key_1": "value 1"
    },
    "message": "hello"
  }
]

Backblaze B2
Integration
Backblaze Access
Create a new application key. The application key must have Write access.
Birch
Add the integration to your dashboard.
| Field | Value | Required |
|---|---|---|
| Key ID | The keyId for the given application key | ✔ |
| Application Key | The application key returned by Backblaze | ✔ |
| Endpoint | The endpoint for the bucket you want the logs to write to. Example is s3.us-east-005.backblazevb2.com | ✔ |
| Bucket | The bucket where the logs should be saved | ✔ |
| Key Prefix | A prefix to the path where the logs are put. See additional documentation |
Key Prefix
Logs will be saved to s3://:bucket/(:key_prefix/):source_identifier/:timestamp.json
Let's say you have the following setup:
- Bucket is your_company
- Key prefix is null
- You did not set an identifier on the logger.
Birch.identifier = nil - The UUID is
e903d25d-eabc-4038-a149-bccf87830021. Example:let uuid = Birch.uuid
Logs will be written to:
s3://your_company/e903d25d-eabc-4038-a149-bccf87830021/1674146985.json
Let's say you have this setup:
- Bucket is your_company
- Key prefix is birch_logs
- You set an identifier on the logger.
Birch.identifier = "abc123"
Logs will be written to
s3://your_company/birch_logs/abc123/1674146985.json
Log Format
[
  {
    "timestamp": "2022-10-25T02:05:15+00:00",
    "level": 0,
    "source": {
      "uuid": "954257b7-1feb-4fd1-8cb8-a047a105ff26",
      "package_name": "com.gruffins.birch.app",
      "app_version": "1.0",
      "app_build_number": "1",
      "brand": "google",
      "manufacturer": "google",
      "model": "pixel 3a",
      "os": "Android",
      "identifier": "user_id",
      "custom_property__key": "value",
      "custom_property__key_1": "value 1"
    },
    "message": "hello"
  }
]
Other
If the drain you're looking for is not available. Send me a note at ryan[at]ryanfung.com. There is a good chance we can get it integrated relatively quickly.
Environments
For established applications, you may find that you have several environments for various stages of the development cycle.
Here's a real world example of how a company manages their mobile logs.
Software Development Cycle
The company use GitFlow branching model and has 4 primary branches.
| Branch | Description |
|---|---|
| production | The code that is deployed to production. |
| staging | The code prior to deploying to production. This acts as a staging area before pushing to production. |
| develop | The active development branch |
| sandbox | A branch to used for internal demos and/or QA. |
Logging Setup
There are a total of 8 environment Birch environments to match this setup.
| Environment | Log Level | Flush Period | Description |
|---|---|---|---|
| ios-production | ERROR | 1h | Only track errors by default. |
| ios-staging | TRACE | 30s | Since QA is run here and there are few devices, log verbosely. |
| ios-sandbox | TRACE | 30s | Same as staging |
| ios-develop | ERROR | 1h | Developers have access to console so remote logging likely unneccessary. |
| android-production | ERROR | 1h | Only track errors by default. |
| android-staging | TRACE | 30s | Since QA is run here and there are few devices, log verbosely. |
| android-sandbox | TRACE | 30s | Same as staging |
| android-develop | ERROR | 1h | Developers have access to logcat so remote logging likely unneccessary. |
Scrubbers
Scrubbing is the process of removing sensitive logging information before it leaves the device. Scrubbing happens on the agent so it stops sensitive data at the source, limiting it's exposure to other services.
Birch will automatically apply an email and a password scrubber to your logs.
Creating a Scrubber
A scrubber simply needs to extend the Scrubber class and override the scrub() function.
scrub() is called for every log message and is responsible for returning a cleansed string.
Kotlin
import com.gruffins.birch.Scrubber

class YourScrubber: Scrubber {
  override fun scrub(input: String): String {
    return input.replace("YOUR_REGEX".toRegex(), "[FILTERED]")
  }
}
Swift
import Birch

class YourScrubber: Scrubber {
  init() {}

  public func scrub(input: String) -> String {
    return input.replacingOccurrences(
      of: "YOUR_REGEX",
      with: "[FILTERED]",
      options: [.regularExpression, .caseInsensitive]
    )
  }
}
React Native
function customScrubber(input: string): string {
  return input.replaceAll(YOUR_REGEX, "[FILTERED]");
}
Register Your Scrubber
Add your scrubber when you initialize the agent.
Kotlin
Birch.init(
  context,
  "API_KEY",
  "PUBLIC_ENCRYPTION_KEY",
  Options().also {
    it.scrubbers = listOf(PasswordScrubber(), EmailScrubber(), YourScrubber())
  }
)
Swift
let options = Options()
options.scrubbers = [PasswordScrubber(), EmailScrubber(), YourScrubber()]

Birch.initialize(
  "API_KEY",
  publicKey: "PUBLIC_KEY",
  options: options
)
React Native
import Birch, { emailScrubber, passwordScrubber } from 'react-native-birch';
import { useEffect } from 'react';

function customScrubber(input: string): string {
  return input.replaceAll(REGEX, "[FILTERED]");
}

export default function App() {
  useEffect(() => {
    Birch.init({
      apiKey: "api_key",
      publicKey: "public_key",
      options: {
        scrubbers: [customScrubber, emailScrubber, passwordScrubber],
      }
    })
  }, []);

  return (
    <></>
  )
}
Multi Agent
In the case you may want to have multiple loggers that serve different purposes, Birch can operate with multiple agents.
An example of multi agent is if you wanted the following:
- An agent strictly for analytics that drains to Elasticsearch.
- An agent for general purpose logging that drains to Logtail.
Each agent can have independent configurations and environments.
Getting Started
Instead of using the Birch class, you will now use the Agent class.
Each agent must have a unique directory.
Kotlin
import com.gruffins.birch.Agent

class MyApp: Application() {

  lateinit var analytics: Agent
  lateinit var logger: Agent

  override fun onCreate() {
    super.onCreate()

    analytics = Agent("analytics").also {
      it.init(this, "ANALYTICS_API_KEY", "ANALYTICS_PUBLIC_ENCRYPTION_KEY")
      it.identifier = "your_user_id"
    }

    logger = Agent("logger").also {
      it.init(this, "LOGGER_API_KEY", "LOGGER_PUBLIC_ENCRYPTION_KEY")
      it.identifer = "your_user_id"
    }

    analytics.d { "app_started" }
    logger.d { "Application started" }
  }
}
Swift
import Birch

@UIApplicationMain
class AppDelegate: UIResponder, UIApplicationDelegate {

  var analytics: Agent!
  var logger: Agent!

  func application(_ application: UIApplication, didFinishLaunchingWithOptions launchOptions: [UIApplicationLaunchOptionsKey: Any]?) -> Bool {

    analytics = Agent(directory: "analytics")
    analytics.initialize("ANALYTICS_API_KEY", publicKey: "ANALYTICS_PUBLIC_ENCRYPTION_KEY")
    analytics.identifier = "your_user_id"

    logger = Agent(directory: "logger")
    logger.initialize("LOGGER_API_KEY", publicKey: "LOGGER_PUBLIC_ENCRYPTION_KEY")
    logger.identifier = "your_user_id"

    return true
  }
}
Release Notes
This page provides a changelog that lists new releases and describes updates to the platform.
Release Notes
March 15, 2025
Platform - Added support for Backblaze B2.
January 16, 2024
React Native - Released version 0.1.0
January 12, 2024
Swift - Released version 1.9.0
January 5, 2024
Android - Released version 1.7.0
November 7, 2023
Swift - Release version 1.8.0 which supports XCode 15.
February 26, 2023
Android - Released version 1.6.0
Swift - Released version 1.7.0
February 18, 2023
Platform - Added support for Google Cloud Logging.
February 4, 2023
Android - Released version 1.5.0
Swift - Released version 1.6.0
January 27, 2023
Platform - Added support for Wasabi drains.
January 21, 2023
Platform - Moved documentation to https://birch-docs.ryanfung.com.
Documentation - Added log format samples to all drains.
January 16, 2023
Platform - Added support for S3 drains.
January 11, 2023
Android - Added multiple configuration options to control console logging, remote logging, log level override, and more.
January 8, 2023
Platform - Added support for CloudWatch drains.
